
by Erin RobotGrrl | Jan 18, 2020 | News, Progress Logs
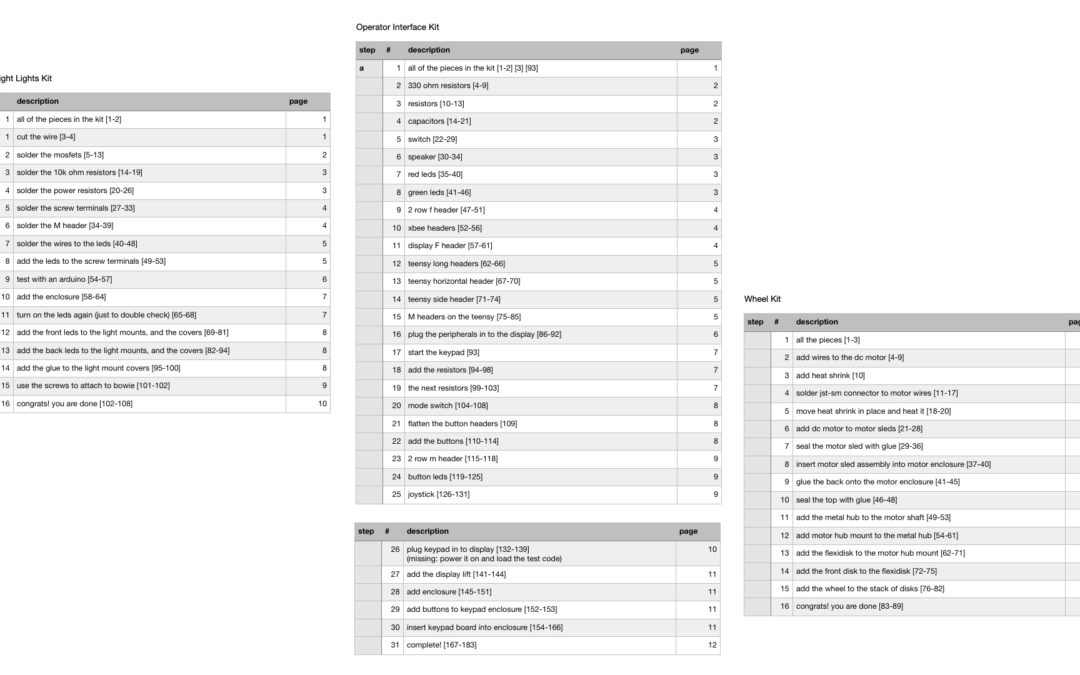
Huzzah! The other two kits join the party. Check out the steps here: operator interface and wheel kit. Press the big green button on those pages that says GO.
Wow, that was sure a lot of work to reach this point. This is exciting though, because now we — everyone — can see some of the steps to make their own Bowie. It’s getting closer, a tiny bit closer, to our vision of having a repository of environmental tools add-ons for Bowie, and having many people all around the world contributing to it, and running their own Field Tests. Maybe this is getting a little ahead of ourselves, since there’s still plenty more work to do. But at least we’re a lot closer than 38 kit logs ago!
Now, all the 5 kits are at step 8. Here’s the list again since it was a while ago since this was posted:
Steps in the documentation process:
1) Lists of the components for bill of materials and packing list
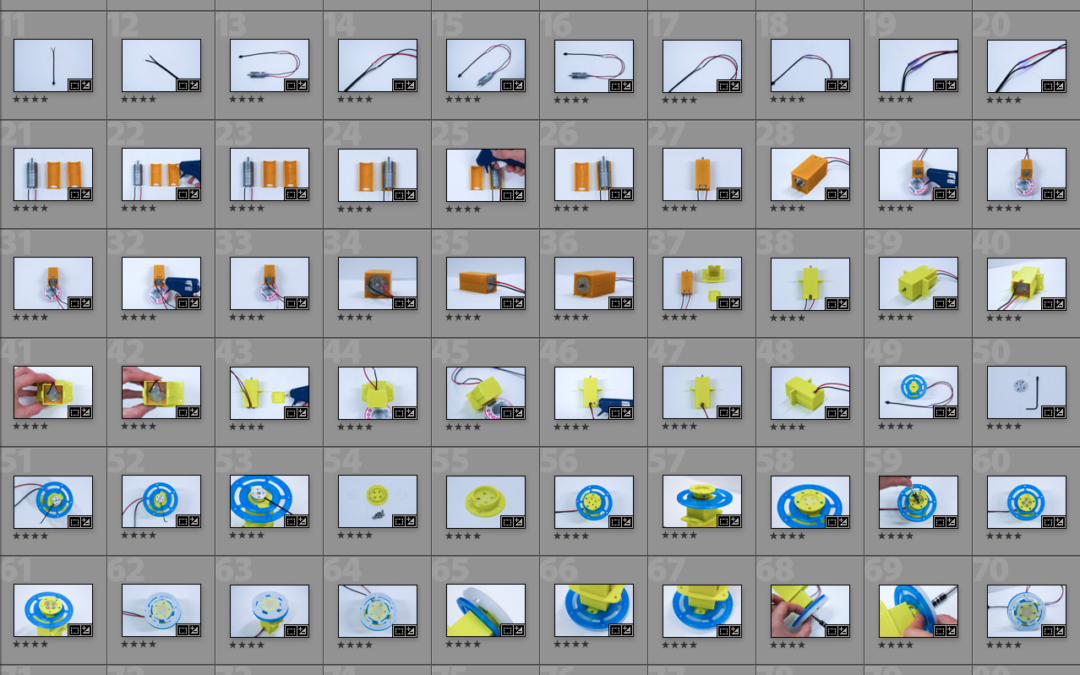
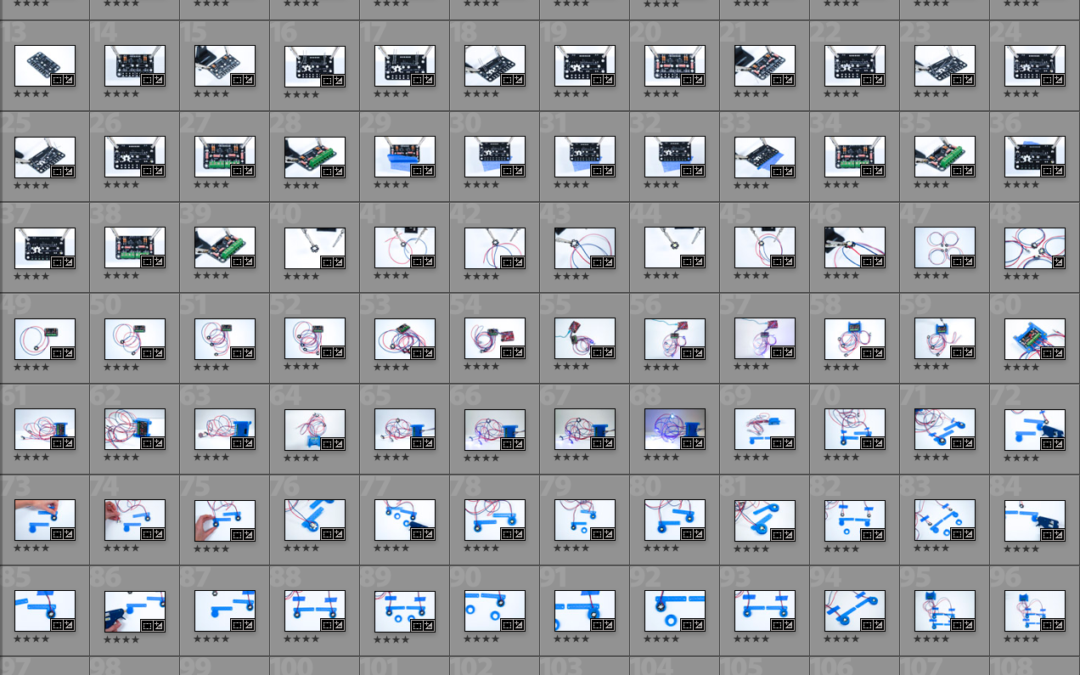
2) Photos of step-by-step assembly process
3) Photo editing of the photos
4) Written description of each step
5) Editing review
6) Formatting for website
7) Publish it
8) Making sure files and code are up and work
9) Add the kits to our online store
10) Ship it
Getting the files and code organised and posted is now the current step. There are also additional notes, for example, for some of the kits, they need their pricing finalised in the bill of materials.
Once all of these are done, or perhaps before, are the assembly instructions for the 3D printed pieces.
The work continues!

by Erin RobotGrrl | Jan 14, 2020 | News, Progress Logs
Woohoo! All of the kit steps are complete! Today, completed the wheel kit written descriptions and parts. This concludes that phase of the written documentation. Now we can start to look forward to some beta testing on the electronics!
Additionally, today we looked at css for buttons, which will go at the bottom of each page to go forwards and backwards to the subsequent part. The test buttons are implemented on this page here.
The next kit log we will be able to adjust the python script as needed. It will be great to have it set up so that it can output each part as an entire page, with the buttons too, to just paste into wordpress.
All this said, it’s just the conclusion of one phase. There is still additional written work to be done, this would be for the CAD images documentation. All the CAD model images are done – for each step. They are also annotated (circles where the screws insert etc). The good news is that now that we have a process – between the google sheets and python scripts – it might be a bit faster. We’ll see.
Huzzah! That part is complete! Finally!
by Erin RobotGrrl | Jan 1, 2020 | News, Progress Logs
This kit log the instruction outline for the trio of kits was completed. The templates on google docs were created too. The super bright lights kit instructions ranges 16 steps, onto 10 pages. Operator interface kit ranges 31 steps onto 12 pages. Wheel / motor kit ranges 16 steps onto 7 pages.
When creating the templates from the outline into google docs, we were almost done then realised that we were listing out each step as a page, instead of vice versa. It didn’t take long to fix. There was enough time to start on the super bright lights kit instructions, by adding the images.
Adding an image takes quite a bit of manual input:
- select finder
- highlight image file
- drag onto google doc, enter
- back to finder, enter, copy file name
- back to google doc, in the right table cell, enter, paste file name
For the number of images we will be needing to add, it’s likely this is not going to be an approach that will be friendly on time. There could be ways of automating this – a simple python script could output the html for a table given the number range of images.
This would meen the first drafts would be on wordpress rather than google docs. It might make it more tricky for beta testers to directly add their feedback. Maybe if we included a numbering system for each step, then that would at least help for indexing the feedback to the steps? If we do skip the google docs then that meens we’re already formatting the content in its final medium, which might be beneficial to figure out.
The next step will be to set up some example formatting tests on the website, and see if html into the editor will turn into wysiwyg editor. The wysiwyg editor will be important in the future for editors to update it. In terms of making progress on the instruction written descriptions, it’s easier to do when looking at the images in sequence. This makes it better to understand if the order needs to be changed, or if something can be deleted. So getting this new step figured out will be first. The brain kit will be a good candidate to try this with since all the written descriptions are complete.
by Erin RobotGrrl | Dec 31, 2019 | News, Progress Logs
Today we completed the editing for the photos on the motor kit. As well, we exported all the edited photos and backed them up.
The super bright lights kit, operator interface, and motor kit all advance to the next stage – which will be writing the first pass of the written descriptions for the instructions.
Happy new year (soon)!
by Erin RobotGrrl | Dec 28, 2019 | News, Progress Logs
Today’s progress was making a small dent in the mountain of photos to edit. The process involves importing, looking at each one, and flagging the best ones (most in focus, clear, shows what is happening). Here’s a look at it number wise:
Super bright lights is 570 photos total, with 108 of them to be edited. Editing = done.
Operator interface is 750 photos total, with 187 of them to be edited. Editing = started, but not done (need to crop and double check colour correction).
Wheel kit is 440 photos total, with 91 of them to be edited. Editing = not started.
The next kit log will continue this progress on the photos.