
by Erin RobotGrrl | Jan 19, 2020 | News, Progress Logs
By coincidence, was reminded that the brain kit instructions need updating. This was the first kit that we worked on and realised that we are definitely going to need to write a script to help automate some of this. Their google sheet needed a few tweaks to have it compliant with the python script to generate the html of the instruction pages. Today, these tweaks were made, and the generator ran smoothly. The brain kit instruction pages are now updated. Check it out here: bowie brain kit and press the big green GO button.
As mentioned in the previous kit log, the next kit log will be about some of the other todo items like organising the bill of materials for a few of the kits.

by Erin RobotGrrl | Jan 18, 2020 | News, Progress Logs
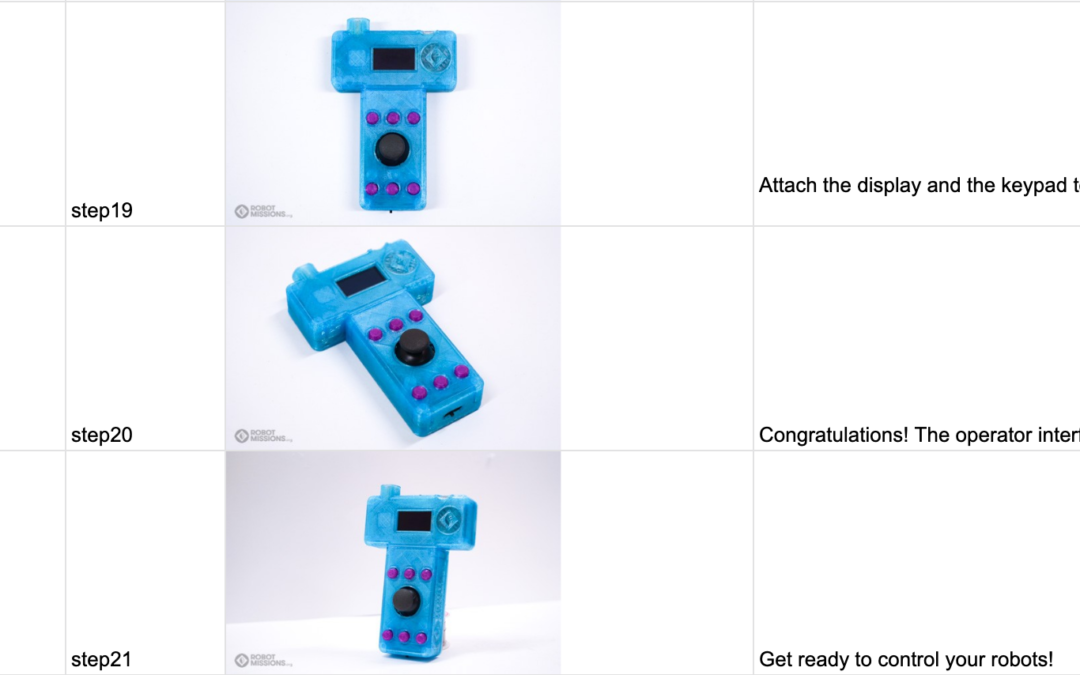
Huzzah! The other two kits join the party. Check out the steps here: operator interface and wheel kit. Press the big green button on those pages that says GO.
Wow, that was sure a lot of work to reach this point. This is exciting though, because now we — everyone — can see some of the steps to make their own Bowie. It’s getting closer, a tiny bit closer, to our vision of having a repository of environmental tools add-ons for Bowie, and having many people all around the world contributing to it, and running their own Field Tests. Maybe this is getting a little ahead of ourselves, since there’s still plenty more work to do. But at least we’re a lot closer than 38 kit logs ago!
Now, all the 5 kits are at step 8. Here’s the list again since it was a while ago since this was posted:
Steps in the documentation process:
1) Lists of the components for bill of materials and packing list
2) Photos of step-by-step assembly process
3) Photo editing of the photos
4) Written description of each step
5) Editing review
6) Formatting for website
7) Publish it
8) Making sure files and code are up and work
9) Add the kits to our online store
10) Ship it
Getting the files and code organised and posted is now the current step. There are also additional notes, for example, for some of the kits, they need their pricing finalised in the bill of materials.
Once all of these are done, or perhaps before, are the assembly instructions for the 3D printed pieces.
The work continues!

by Erin RobotGrrl | Jan 17, 2020 | News, Progress Logs
Today’s kit log is pretty exciting. We finally get to see the results of all the work for two of the kits: power pack and super bright lights. Check out the instruction pages! super brights, power pack and press the big green go button
Today we wrote and finished the python script that takes in the steps and parts csv, then outputs a series of html pages. The development process was fine, didn’t get caught on anything real big. Had some off by one bugs, but it wasn’t anything difficult.
There was one mistake we encountered. That is, the images that are on google sheets are input into a cell as a formula. For example, it is =IMAGE(url). When exporting to csv, google sheets does not include this. Unfortunately since we have re-arranged some of the order of the images and deleted some, there isn’t really a way to script or automate copying the image name into another cell. So this has to be done by hand for every step. Shucks. It’s not the end of the world, it is fixable, just a bit of a delay. It was funny when finding this bug, because it was “wonder if this array actually contains anything? let’s print it” and it displayed a whole bunch of nothing in a list.
Either way, we were able to fix two of the instructions today, and prepare the pages on wordpress, and copy and paste the output html from the python script into the pages.
The next kit log will continue on this progress, as there is the operator interface and wheel kit instructions to complete.
by Erin RobotGrrl | Jan 15, 2020 | News, Progress Logs
Today’s kit log has progress scattered in various bits all over the place. There was progress made on starting a new python script that takes both the steps and parts (aka, sections) and will eventually export the html for the pages. We found the first “bug” in the instructions. Bowie brain kit part 9 step 23 has a duplicate image, it should be image z7-2, not z7-1. Being able to be at the point where we can find these bugs is pretty cool, finally.
We also made progress on the ‘last modified’ date that will get updated on each page. This was annoying because we tried various plugins, but they would bork the backend, so we had to try different ways, but then someone on a forum pointed us in a way to make that not happen, and finally the original way worked. It took a bit more time than expected to make ‘last modified’ work.
Additionally, we made progress on moving some of the 3D printed pieces instructions over to google sheets format. It looks like we will use google sheets as the master version, as it is easily editable, and then use the python script to transfer that to the format for the pages. Maybe one day we can make it auto update or something! The next kit log will continue the progress on the script, so that we can start putting up the pages.

by Erin RobotGrrl | Jan 14, 2020 | News, Progress Logs
Woohoo! All of the kit steps are complete! Today, completed the wheel kit written descriptions and parts. This concludes that phase of the written documentation. Now we can start to look forward to some beta testing on the electronics!
Additionally, today we looked at css for buttons, which will go at the bottom of each page to go forwards and backwards to the subsequent part. The test buttons are implemented on this page here.
The next kit log we will be able to adjust the python script as needed. It will be great to have it set up so that it can output each part as an entire page, with the buttons too, to just paste into wordpress.
All this said, it’s just the conclusion of one phase. There is still additional written work to be done, this would be for the CAD images documentation. All the CAD model images are done – for each step. They are also annotated (circles where the screws insert etc). The good news is that now that we have a process – between the google sheets and python scripts – it might be a bit faster. We’ll see.
Huzzah! That part is complete! Finally!
by Erin RobotGrrl | Jan 13, 2020 | News, Progress Logs
The operator interface written descriptions for the steps and the parts is now complete. The end result was 120 steps total, and 11 parts.
The remaining kit for the written descriptions is the wheel kit. This will be next, then the python script work can happen to prepare all the instructions to be on the website. We are getting closer, kitlog by kitlog.